فروش اقساطی

خدمات

با استفاده از این افزونه می توان طرح ها و برنامه های اقساطی مختلف را با هدف افزایش فروش محصولات، تعریف و مدیریت نمود. روال کار به این شکل است که مشتری در هنگام ثبت سفارش،گزینه های مبلغ پیش پرداخت و تعداد اقساط رو تعیین میکند و سیستم بطور اتوماتیک محاسبات را انجام داده و اطلاعات مبلغ پیش پرداخت، مبلغ نهایی و مبلغ اقساط را به کاربر نمایش می دهد تا مشتری با پرداخت پیش پرداخت، سفارش را ثبت نماید. برخی از امکانات مدیر سیستم در این افزونه عبارتند از: امکان تنظیم شرایط اقساط برای هر محصول (حداکثر تعداد اقساط،درصد کارمزد ماهانه،درصد پیش پرداخت)، مشاهده و ارجاع سفارشات اقساطی به اپراتور اعتباری(جهت پیگیری تکمیل مدارک و تعیین وضعیت سفارش)، امکان ارسال لینک پرداخت اقساط به مشتری، مشاهده و پیگیری مدارک ارسالی و نواقص پرونده های خرید اقساطی، مشاهده سوابق خرید مشتری.

راهنمای افزونه ی فروش اقساطی محصولات 

روال کار به این شکل است که کاربر ابتدا گزینه های مبلغ پیش پرداخت و تعداد اقساط رو تعیین میکند و سیستم اتوماتیک قیمت نهایی را به کاربر میدهد . بعد روال خرید بصورت عادی انجام میشود تا کاربر به صفحه پرداخت میرسد ، در صفحه پرداخت مبلغ پیش پرداخت و مبلغ نهایی و مبلغ اقساط را مشاهده میکند و بعد از ثبت سفارش اگر سفارش موفقیت امیز باشد کاربر مشخصات سفارش قسطی خود را دریافت خواهد کرد . پس از ثبت این سفارش مشخصات خرید قسطی در کنترل پنل کاربر قابل مشاهده است . و مدیر میتواند پس از دریافت مدارک  ارسالی و چک های ضمانت، وضعیت نهایی سفارش را تائید نماید تا حواله انبار آن صادر گردد.
نمایش محصول با شرایط اقساط
۱) تعیین شرایط اقساط کالای مورد نظر توسط ادمین فروشگاه

در ابتدا به جهت تعریف شرایط فروش اقساطی یک کالا مدیر فروشگاه بایستی به آدرس زیر در پنل مدیریتی خود مراجعه کند و تنظیمات مورد نظر خود را وارد نماید:

ورود به پنل مدیریت > منوی محصولات > فروش اقساطی

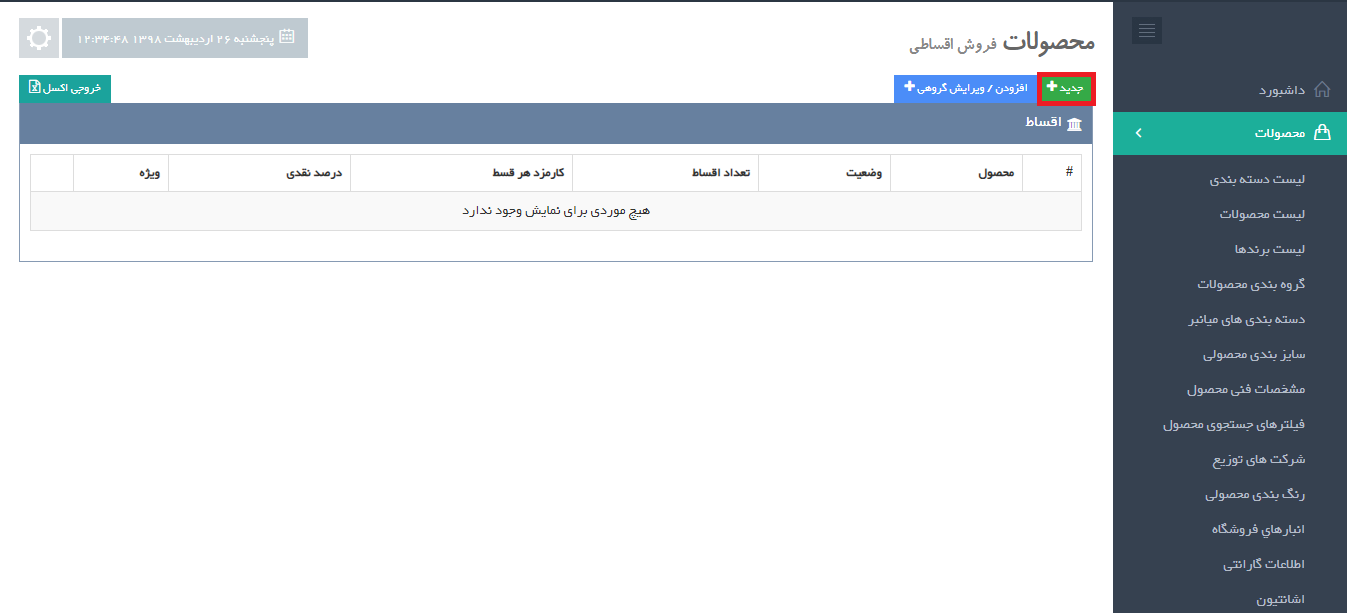
در صفحه ی پیش رو این امکان برای شما تعبیه شده است تا شرایط اقساطی محصولات مورد نظر خود را بصورت تکی و یا گروهی تعریف نمایید.

۱.۱) تعریف شرایط اقساطی برای یک محصول

در صفحه ی روبرو بر روی گزینه ی “جدید” کلیک کنید:

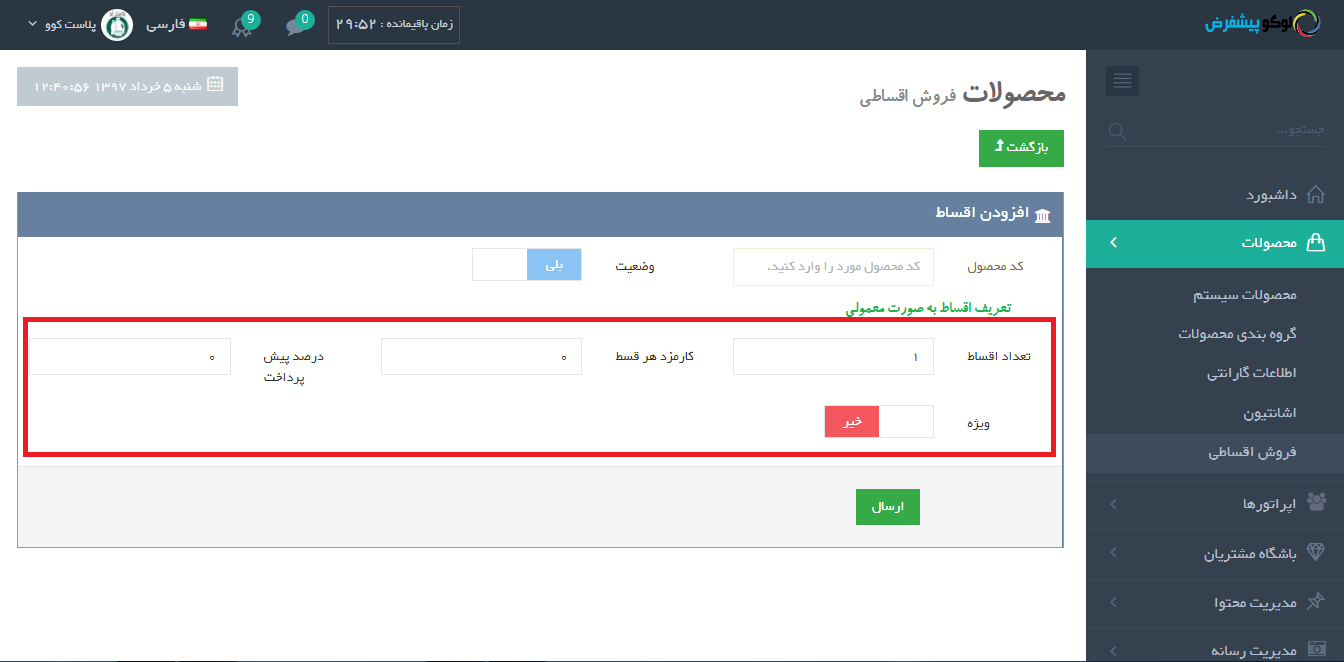
با کلیک برروی این گزینه صفحه ی تنظیمات روبرو برای شما نمایش داده می شود:

فیلدهای فرم بالا را برحسب شرایط مورد نظر خود و راهنمای زیر تعریف نمایید:

۱- کد محصول
در این فیلد می توانید کد محصولی را که می خواهید شرایط اقساطی برای آن تعریف نمایید، وارد کنید.
۲- وضعیت
از طریق این فیلد می توانید فعال/غیرفعال بودن شرایط اقساط تعریف شده  را مشخص نمایید.
۳- تعداد اقساط
در این قسمت می توانید مشخص نمایید که مشتری شما حداکثر در چند قسط هزینه ی سفارش خود را پرداخت نماید.
۴- کارمزد هر قسط
در این فیلد می توانید میزان سودی را که می خواهید به ازای هر قسط به شما تعلق گیرد، مشخص نمایید.
۵- درصد پیش پرداخت
از طریق این فیلد می توانید حداقل درصدی از قیمت این محصول را که مشتری می تواند به عنوان پیش پرداخت، پرداخت نماید مشخص کنید.
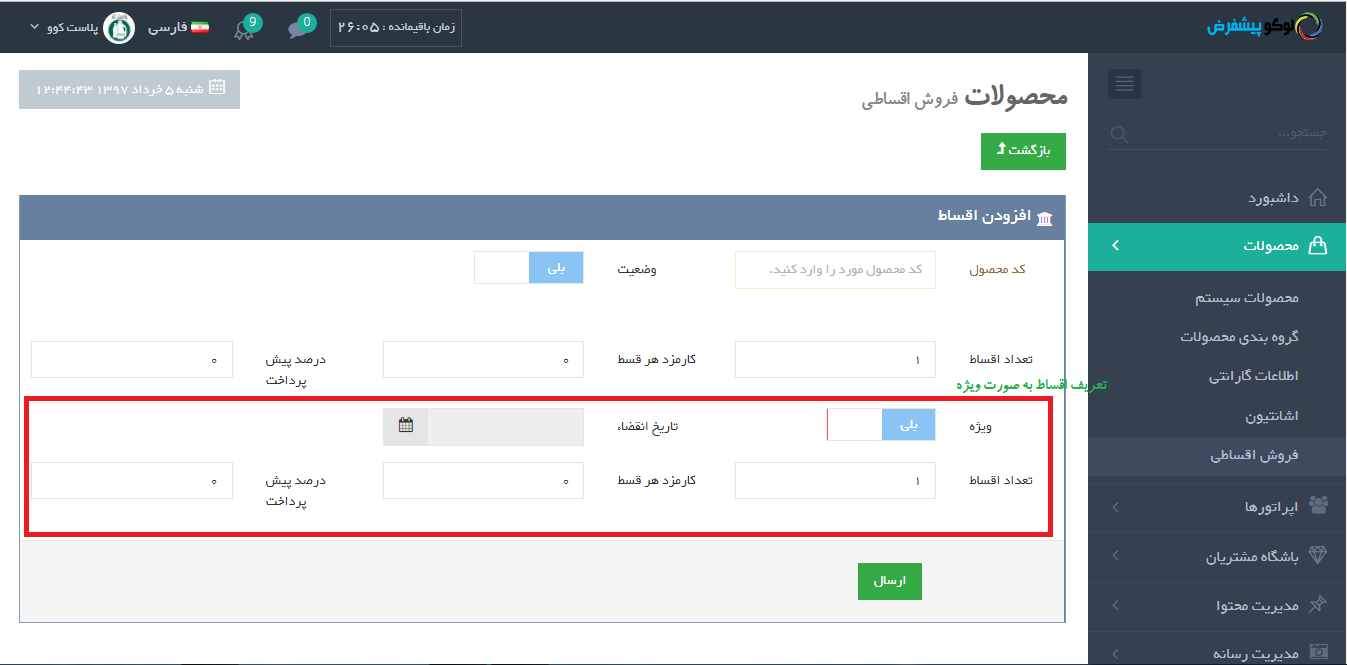
نکته: شما می توانید علاوه بر شرایط معمولی، که برای تعیین نحوه ی فروش اقساطی یک محصول تعریف می کنید، شرایط ویژه ای نیز برای فروش اقساطی آن در نظر بگیرید.

به عنوان مثال: وضعیتی را در نظر بگیرید که در آن یک فروشگاه قصد دارد به مناسبت بعثت رسول اکرم (ص) شرایط ویژه ای را برای فروش اقساطی خود در نظر بگیرید ( در شرایط معمولی کارمزد هر قسط را ۱۵ درصد محاسبه می کند اما در روز مبعث این کارمزد را می خواهد به ۲ درصد کاهش دهد. این فروشگاه می تواند وضعیت ویژه را برروی “بلی”  قرار دهد و فیلدهای نمایش داده شده در زیر آن را بر حسب سیاست فروش خود تکمیل نماید.)

تاریخ انقضا: از طریق این فیلد ادمین می تواند مهلت زمانی را که مشتریان می توانند این روش پرداخت را انتخاب نمایند مشخص نماید. تعیین این فیلد در هنگام تعریف شرایط ویژه اجباری است.

توجه: چنانچه شرایط ویژه ای را برای فروش اقساطی تعریف نمودید حتما بایستی یکی از سه فیلد تعداد اقساط، کارمزد هر قسط و یا درصد پیش پرداخت، با روش معمولی که در بالا تعریف نموده اید متفاوت باشد.

۱.۲) تعریف شرایط اقساطی بصورت گروهی

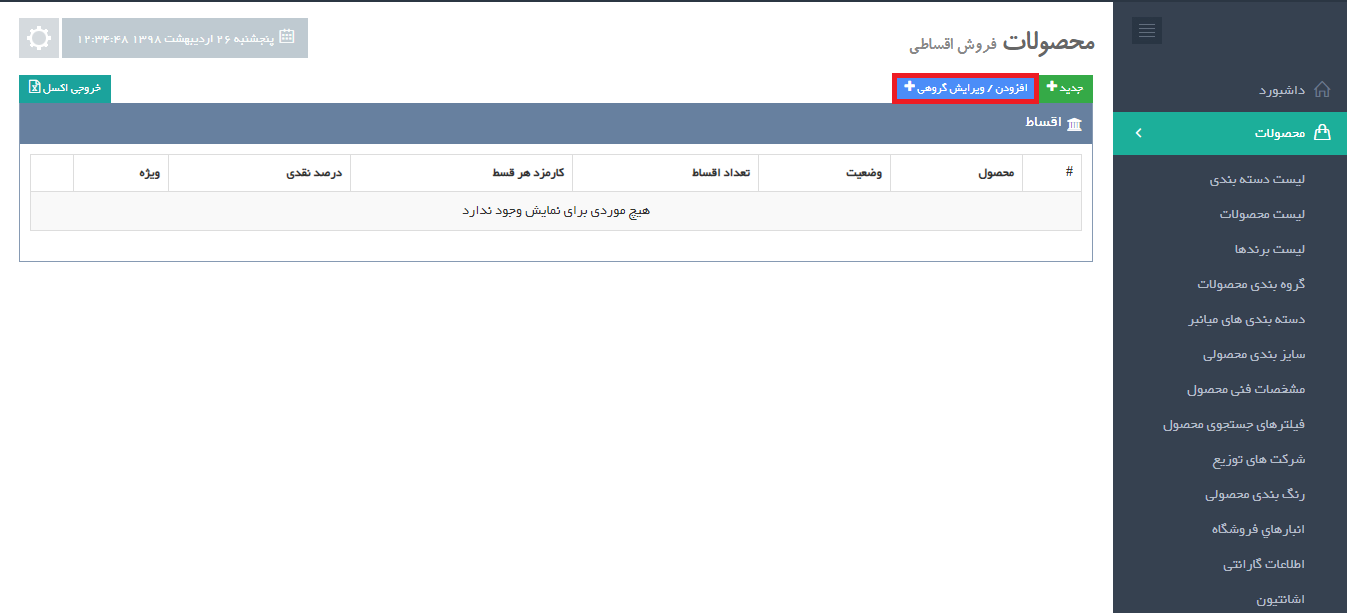
چنانچه تمایل دارید برای چندین محصول خود بصورت یکجا شرایط اقساطی تعیین کنید در صفحه ی رو به رو, برروی گزینه ی “افزودن/ویرایش گروهی” کلیک کنید.
دانلود فایل نمونه اکسل

2. تعریف اپراتور اعتباری  (اختیاری)

پس از ثبت سفارش توسط مشتری، چنانچه روش پرداخت اقساط تعیین شده باشد، ادمین می تواند سفارش مورد نظر را جهت تایید اولیه و تکمیل یکسری اطلاعات مورد نظر به اپراتور مرکز اعتباری ارجاع دهد (این مرحله اختیاری است).
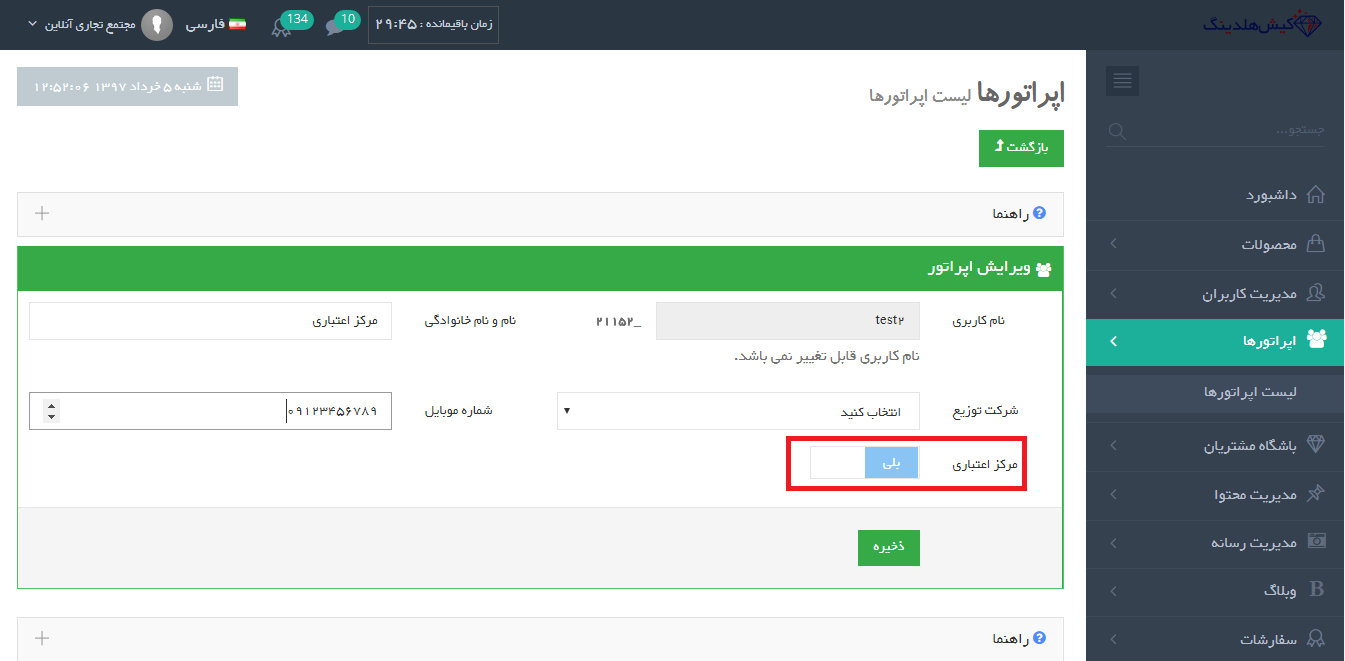
تعریف اپراتور اعتباری

نکته: این مرحله می تواند قبل از مرحله ی ۱ صورت پذیرد.

به منظور تعریف اپراتور اعتباری ادمین بایستی به آدرس ورود به پنل

مدیریت > منوی اپراتورها > لیست اپراتورها

مراجعه نماید:

در این قسمت برروی افزودن کلیک کنید تا صفحه ای مشابه تصویر روبرو شما نمایش داده شود:

۳) ثبت سفارش توسط مشتری

۳.۱) ثبت سفارش در سایت

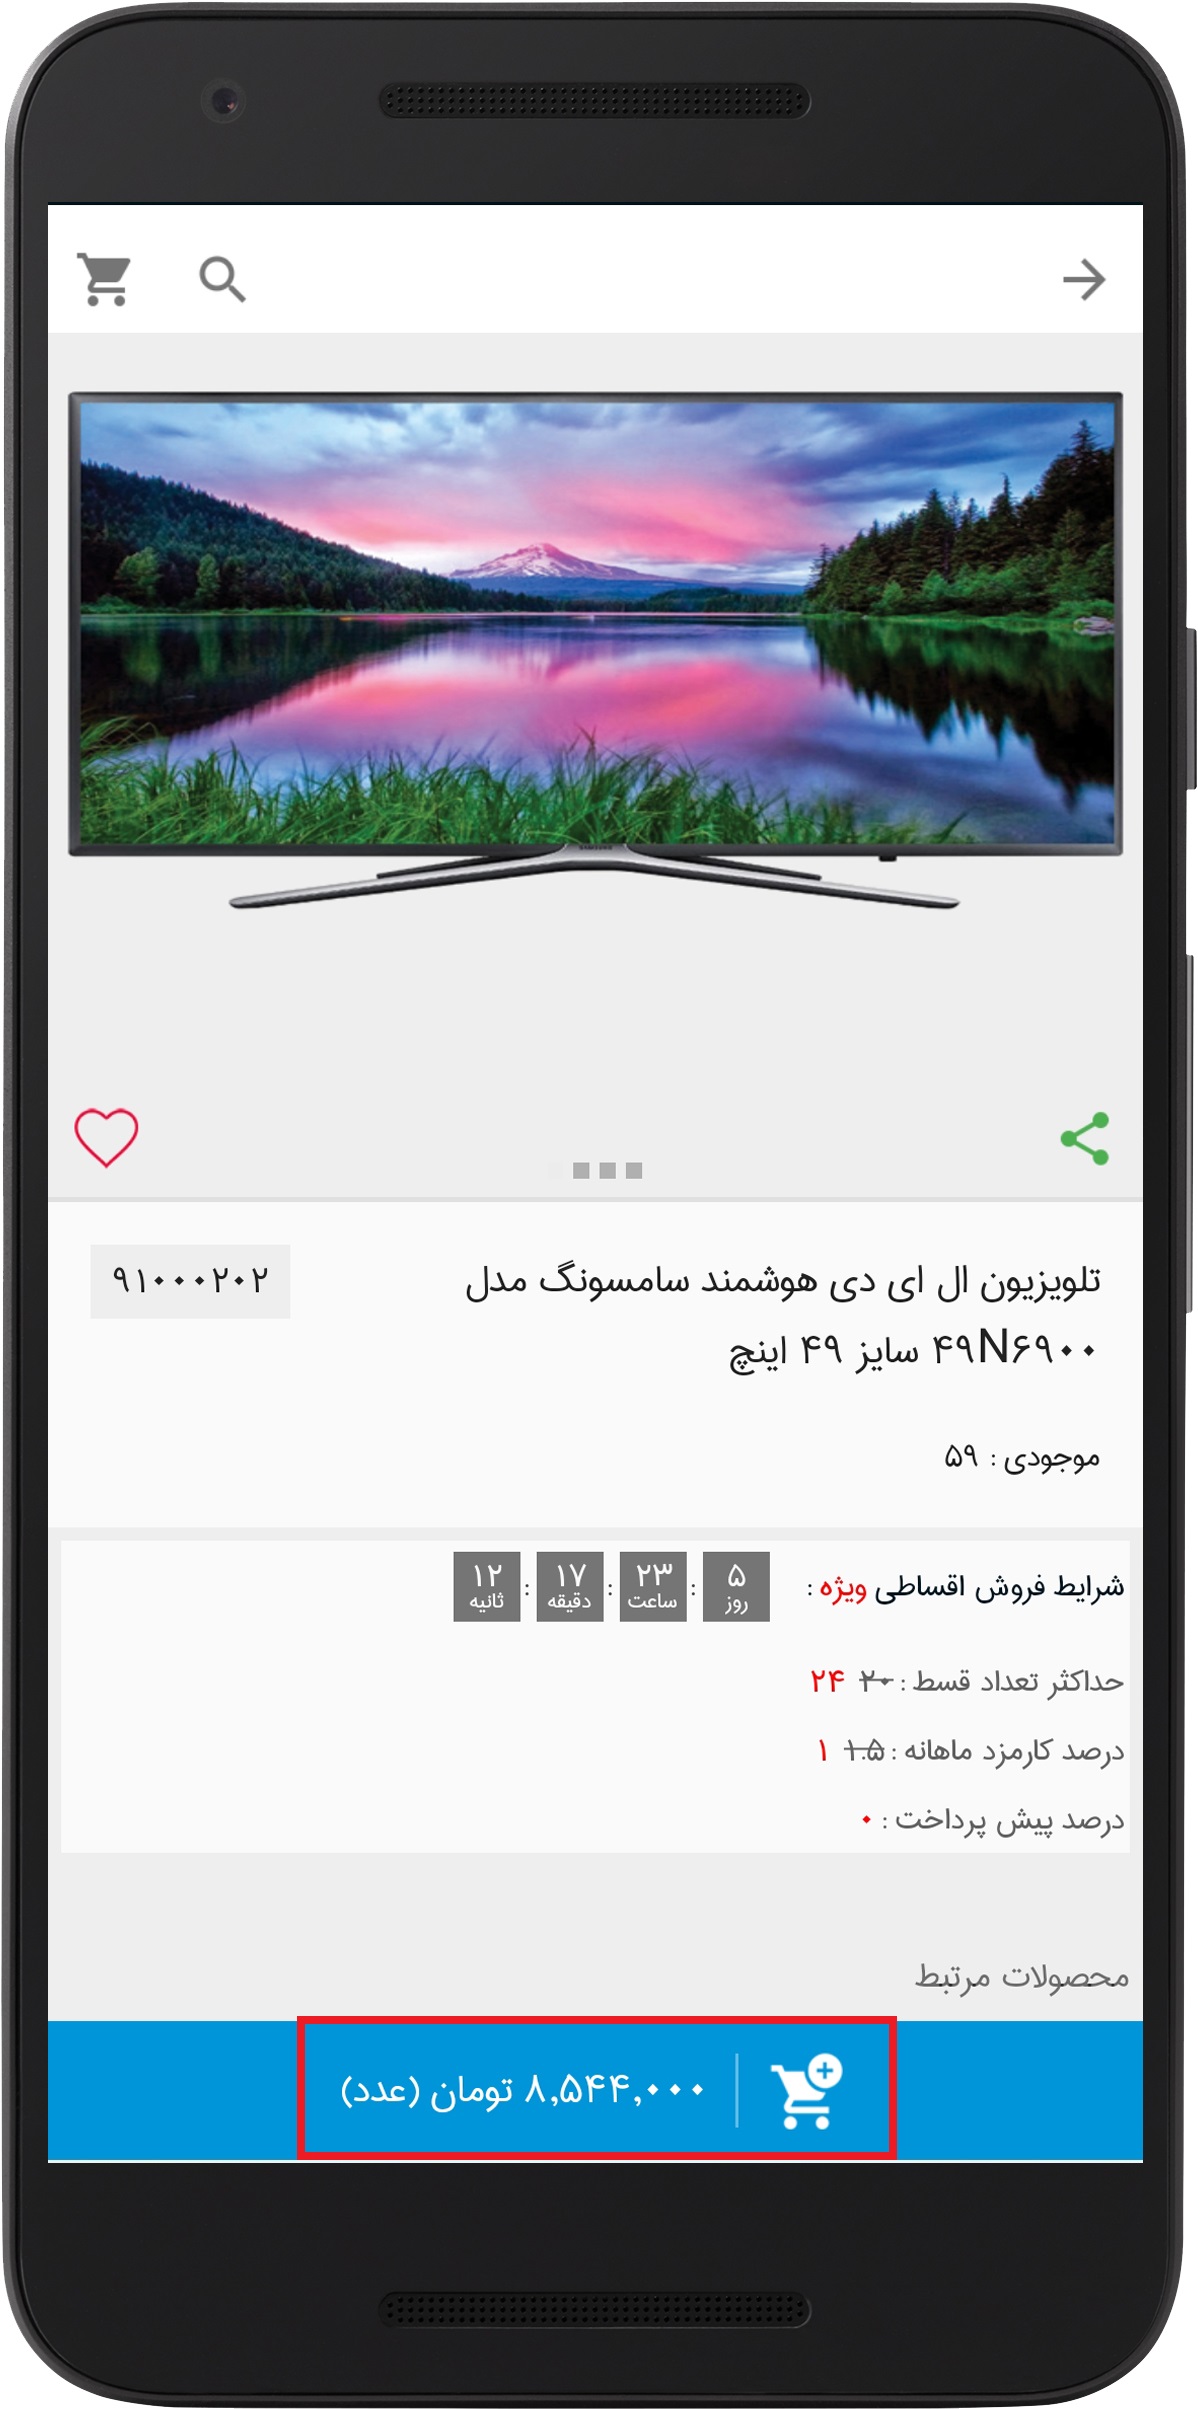
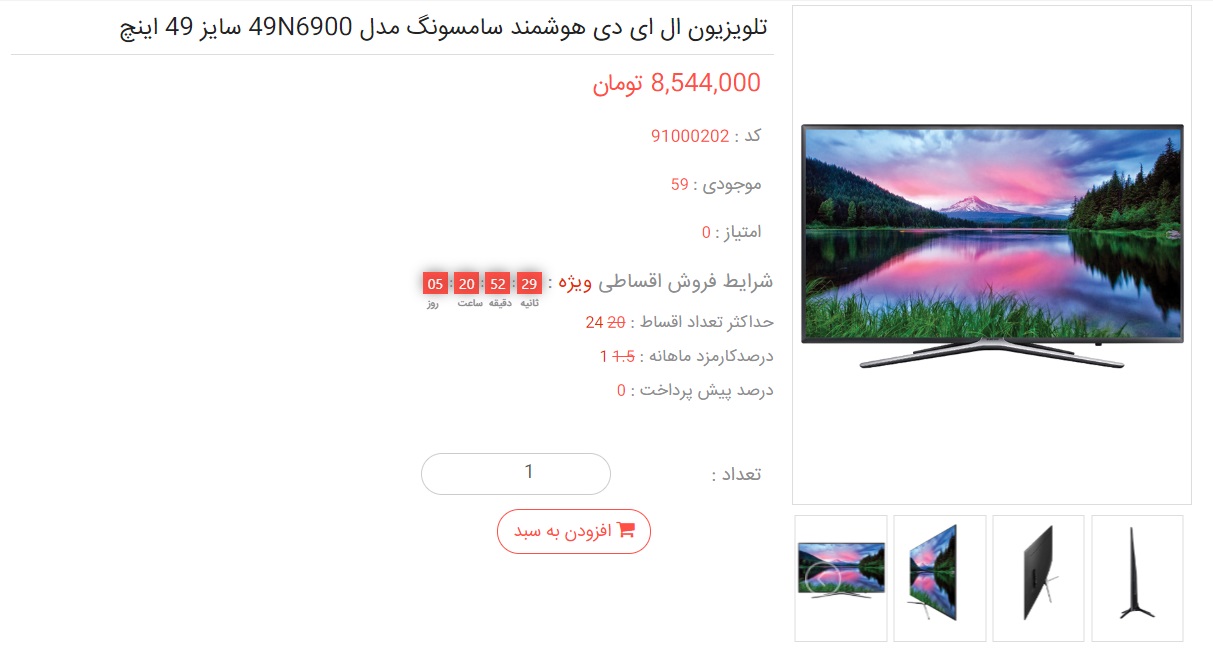
زمانی که یک مشتری به وب سایت شما مراجعه می نماید و جهت خرید یک محصول برروی آن کلیک می کند، چنانچه شما برای این محصول شرایط اقساطی معمولی و ویژه تعریف کرده باشید این شرایط در قسمت اطلاعات آن محصول و مشابه تصویر زیر نمایش داده خواهد شد.
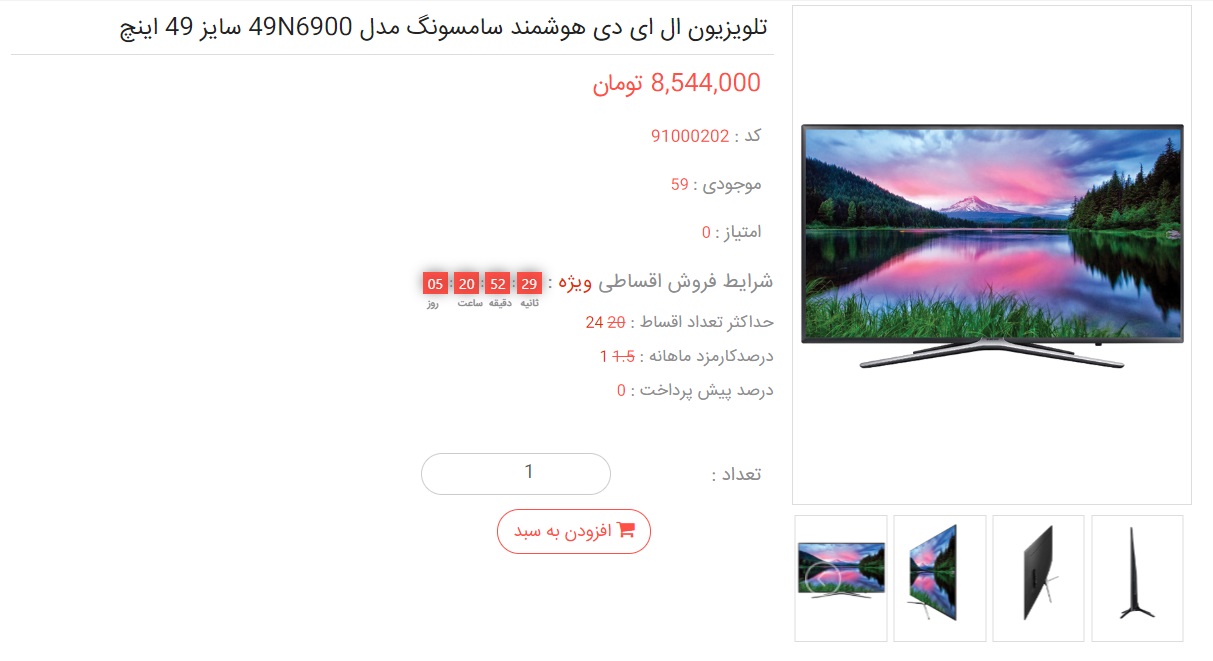
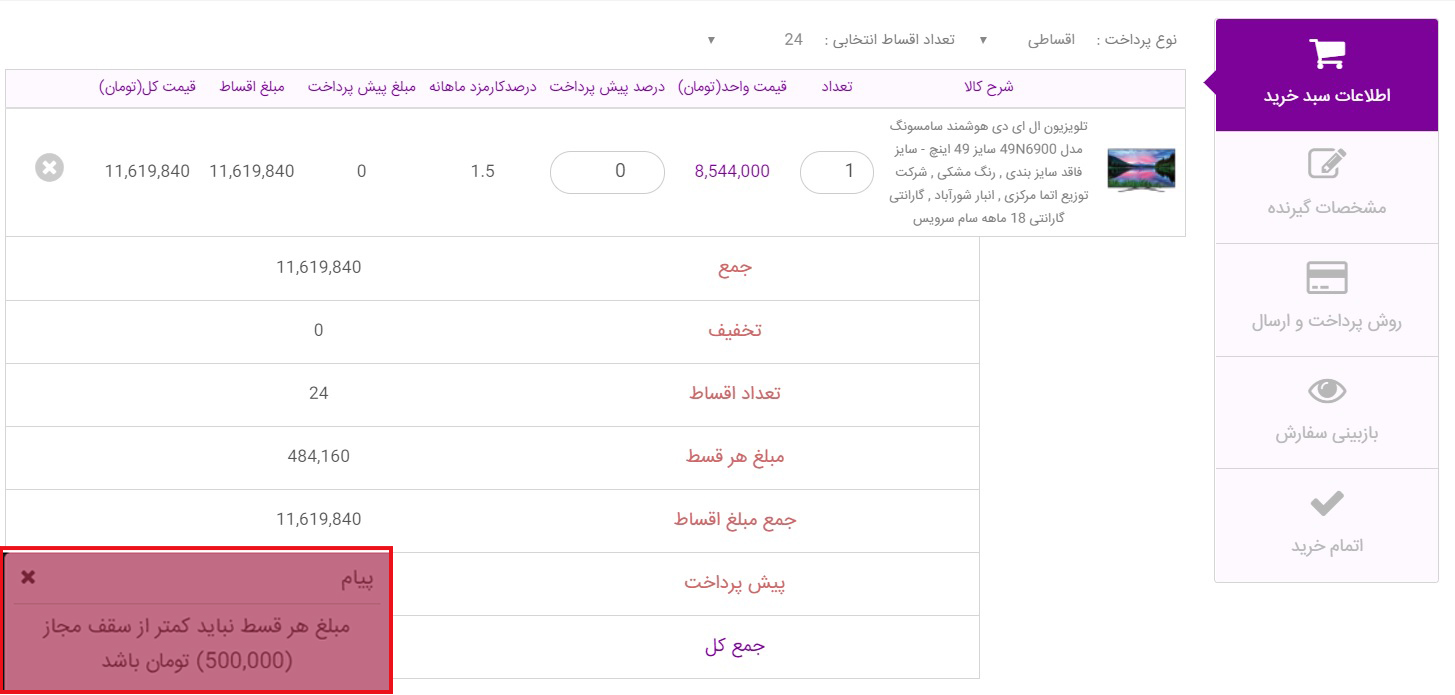
چنانچه مشتری این محصول را به سبد خرید خود اضافه کند، در مرحله ی سبد خرید علاوه بر فیلدهای معمول، فیلد نوع پرداخت را نیز مشاهده خواهد کرد که با انتخاب نوع پرداخت “اقساطی” گزینه های زیر نیز به او نمایش داده خواهد شد.

مشتری می تواند تعداد اقساط و نیز درصد پیش پرداخت خود را در این قسمت مشخص نماید.
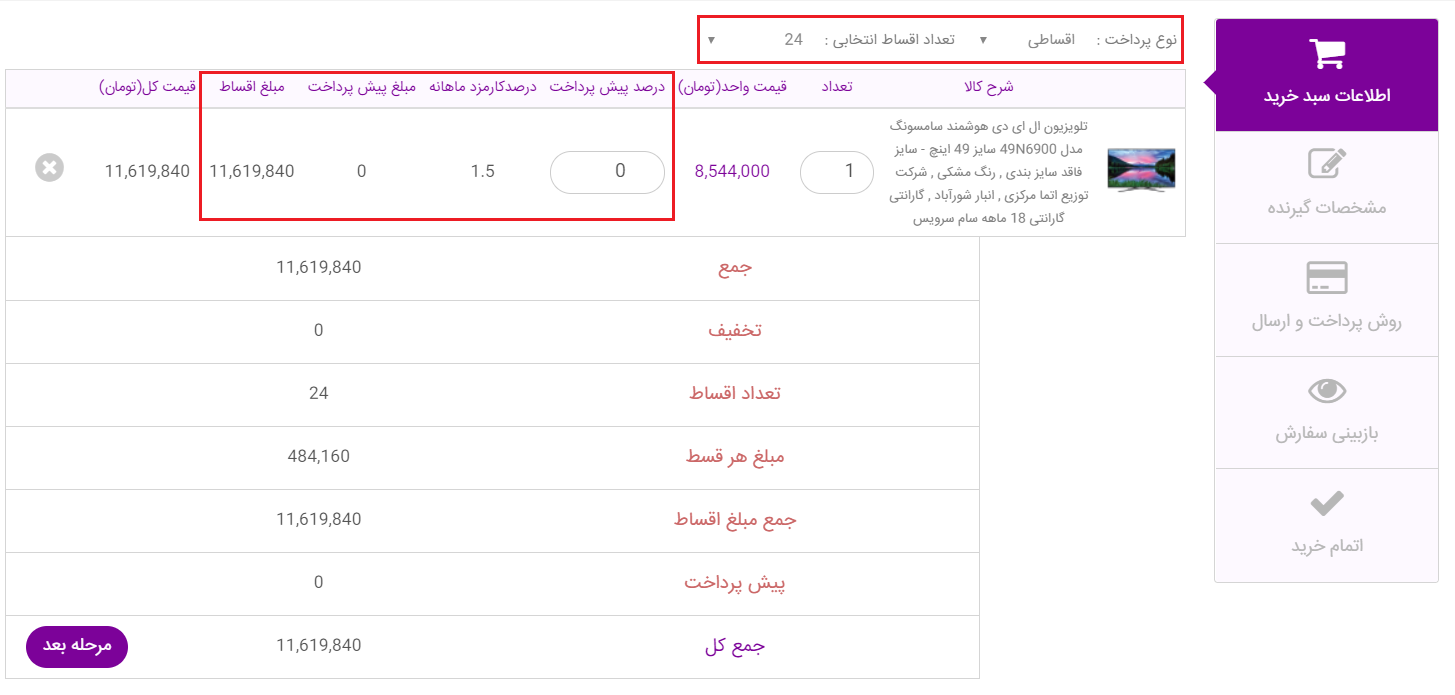
در ادامه مشتری سفارش خود را نهایی و ثبت می کند.


۳.۲) ثبت سفارش در اپلیکیشن
۴) ارجاع سفارش به اپراتور اعتباری (این مرحله اختیاری می باشد و بنا به سیاست فروشگاه می تواند انجام گیرد)

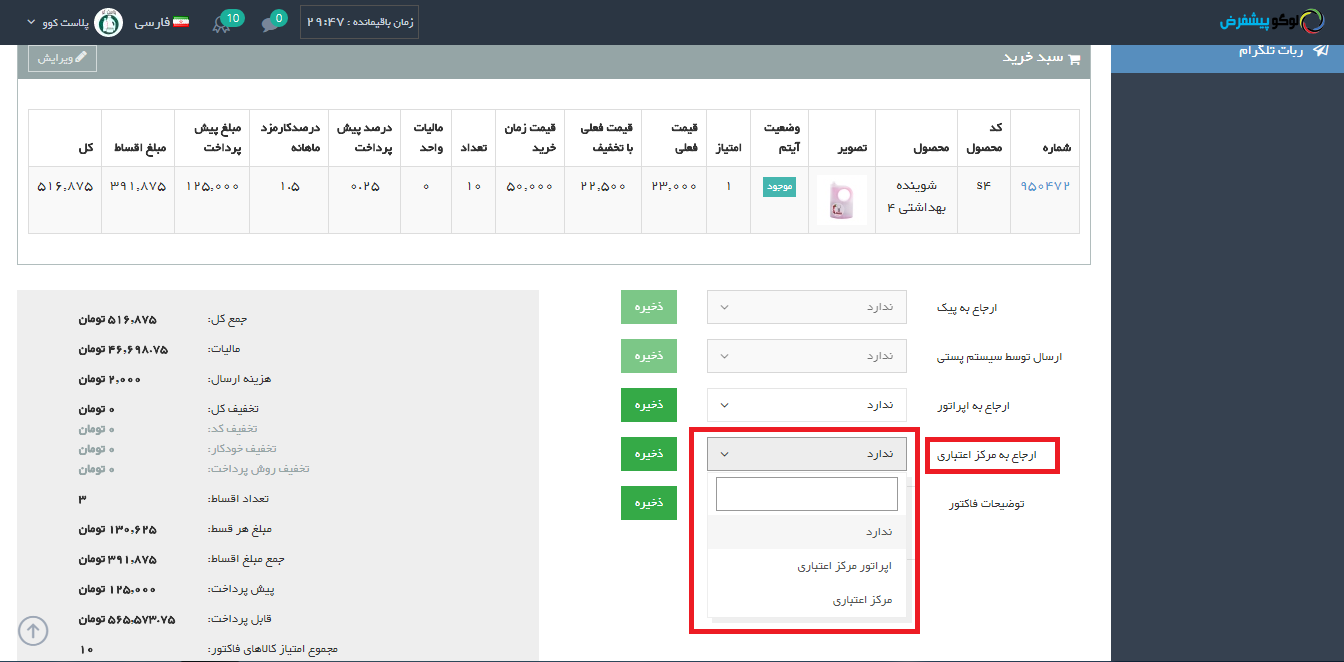
پس از ثبت سفارش توسط مشتری حال ادمین فروشگاه بایستی سفارش را تایید نماید. چنانچه ادمین تمایل داشته باشد که اطلاعات تکمیلی مورد نیاز جهت تایید سفارش اقساطی توسط اپراتور تکمیل گردد بایستی این سفارش را ویرایش و به اپراتور ارجاع دهد، بدین منظور ادمین بایستی به آدرس ورود به پنل مدیریت > منوی سفارشات > لیست سفارشات در پنل مدیریتی خود مراجعه نماید.

در صفحه ی پیش رو سفارش مورد نظر خود را ویرایش کند و از قسمت ارجاع به مرکز اعتباری آن سفارش را به اپراتور مورد نظر خود ارجاع دهد.

در مرحله ی بعد اپراتور بایستی اطلاعات مورد نظر را تایید، تکمیل و ذخیره نماید؛ بدین منظور او بایستی ابتدا به آدرس ورود به پنل

مدیریت > منوی سفارشات > لیست سفارشات

در پنل مدیریتی خود مراجعه نماید.

در صفحه ی پیش رو اپراتور بایستی سفارش مورد نظر خود را ویرایش کند و چنانچه سفارش مورد تایید او است فیلد “آیا سفارش مورد تایید است؟” را برروی “بلی” قرار دهد.

با تایید سفارش صفحه ی روبرو به او نمایش داده می شود، پس از بررسی و تکمیل اطلاعات مورد نیاز بایستی برروی دکمه ی ذخیره کلیک شود.

در مرحله ی بعد ادمین می تواند سفارش را تایید کند.
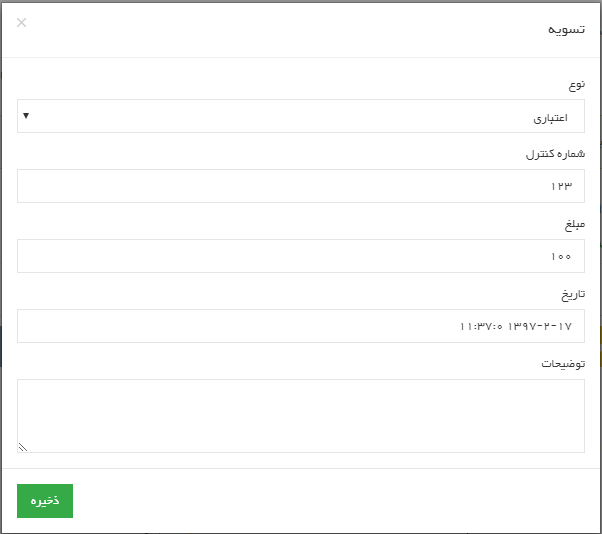
توجه: تمامی مراحل مربوط به اپراتور اعم از تعریف اپراتور، ارجاع سفارش به او و تایید اختیاری می باشند و در صورت تمایل ادمین فروشگاه و بنا به سیاست های مورد نظر او می توانند تعریف شوند یا خیر.

در صورت داشتن هرگونه سوال در رابطه با این آموزش می توانید آن را از طریق تیکت مطرح بفرمایید.

نتیجه‌ای پیدا نشد.

Installment Selling

خدمات

With this plugin you can define and manage different installment plans and programs to increase product sales. The procedure is that the customer, when placing an order, determines the prepaid payment options and the number of installments, and the system automatically performs calculations and displays the information on the prepaid amount, final amount and installment amount to the user. Customer submits order with prepaid payment. Some of the features of the system administrator in this plugin include: Ability to set installment conditions for each product (maximum number of installments, monthly commission percentage, prepayment percentage), view and refer installment orders to the credit operator (to track completion of documents and determine order status) , Ability to send installment payment link to customer, view and track sent documents and defects of installment purchase files, view customer purchase records.

Installment Sales Plugin Guide 

The procedure is that the user first determines the prepayment options and the number of installments and gives the user an automatic final price system. Then the purchase procedure is performed as usual until the user reaches the payment page, the payment page will see the down payment, the final amount and the installment amount, and after the order has been registered the user will receive their installment order details. After registering this order, the installment purchase details will be visible in the user control panel. And the manager can confirm the final order status after receiving the shipping documents and warranty checks so that it can be transferred to the warehouse.

Product ِDisplay With Installment Terms

۱) Determine the installment conditions of the desired product by the store administrator

In order to determine the installment conditions of a product, the store manager must first go to the following address in his admin panel and enter his desired settings:

Login to Admin Panel> Product Menu> Installment Sales

On the next page it is possible for you to define the installment conditions of your products individually or in groups.

۲) Defining the installment conditions for a product

On the front page, click “New”:

Clicking on this option will show you the settings page:

Define the form fields above according to your requirements and the following guide:

۱-code: In this field you can enter the product code for which you want to define the installment terms.

۲- Condition: Through this field you can specify whether the defined installment conditions are active / inactive.

۳-Number of installments: In this section you can specify that your customer will pay the maximum order in several installments.

۴- The fee for each installment: In this field you can specify the amount of profit you want to receive for each installment.

۵- down payment: Through this field you can specify at least a percentage of the price of this product that the customer can pay as a down payment.

Note: You can also specify special terms for installment sales in addition to the usual terms, which you define to determine how to sell a product.

For example: Consider a situation in which a store intends to offer special conditions for your installment on the occasion of Prophet Muhammad (in normal circumstances calculates a commission of 5% but at It wants to reduce this fee by 5% per day, which can set the special status to “Yes” and complete the fields shown below in accordance with its sales policy.)

Expiry Date: Through this field the administrator can specify the time limit for customers to choose this payment method. This field is required when defining special conditions.

Note: If you define special conditions for installment sales, you must be one of the three fields, the number of installments, the commission for each installment or the percentage of down payment, different from the usual method described above.

۱٫۲) Defining installment conditions as a group

If you would like to set the installment requirements for several of your products at once, click on the “Add / Edit Group” option.

Excel Sample File

۲) Credit Operator Definition (optional)

Once the order has been registered by the customer, if the installment payment method is specified, the administrator can refer the order to the credit center operator for initial approval and completion of some information (this is optional).

Credit Operator Definition

Note: This step can be done before step 1.

In order to define the credit operator the admin must enter the address of the panel

Administration> Operators menu> Operators list

Click Add to display a page similar to the image you are facing:

۳) Customer order registration

۳٫۱) Registration of the order on the site

When a customer comes to your website and clicks on a product to buy it, if you have defined the specific installment terms for this product, these terms will appear in the product information section and similar image below. .

If the customer adds this product to their shopping cart, they will also see the payment type field in the shopping cart phase, which will be shown to them by selecting the “installment” payment type below.

The customer can specify the number of installments as well as the percentage of his down payment.

The customer then finalizes and submits his order.

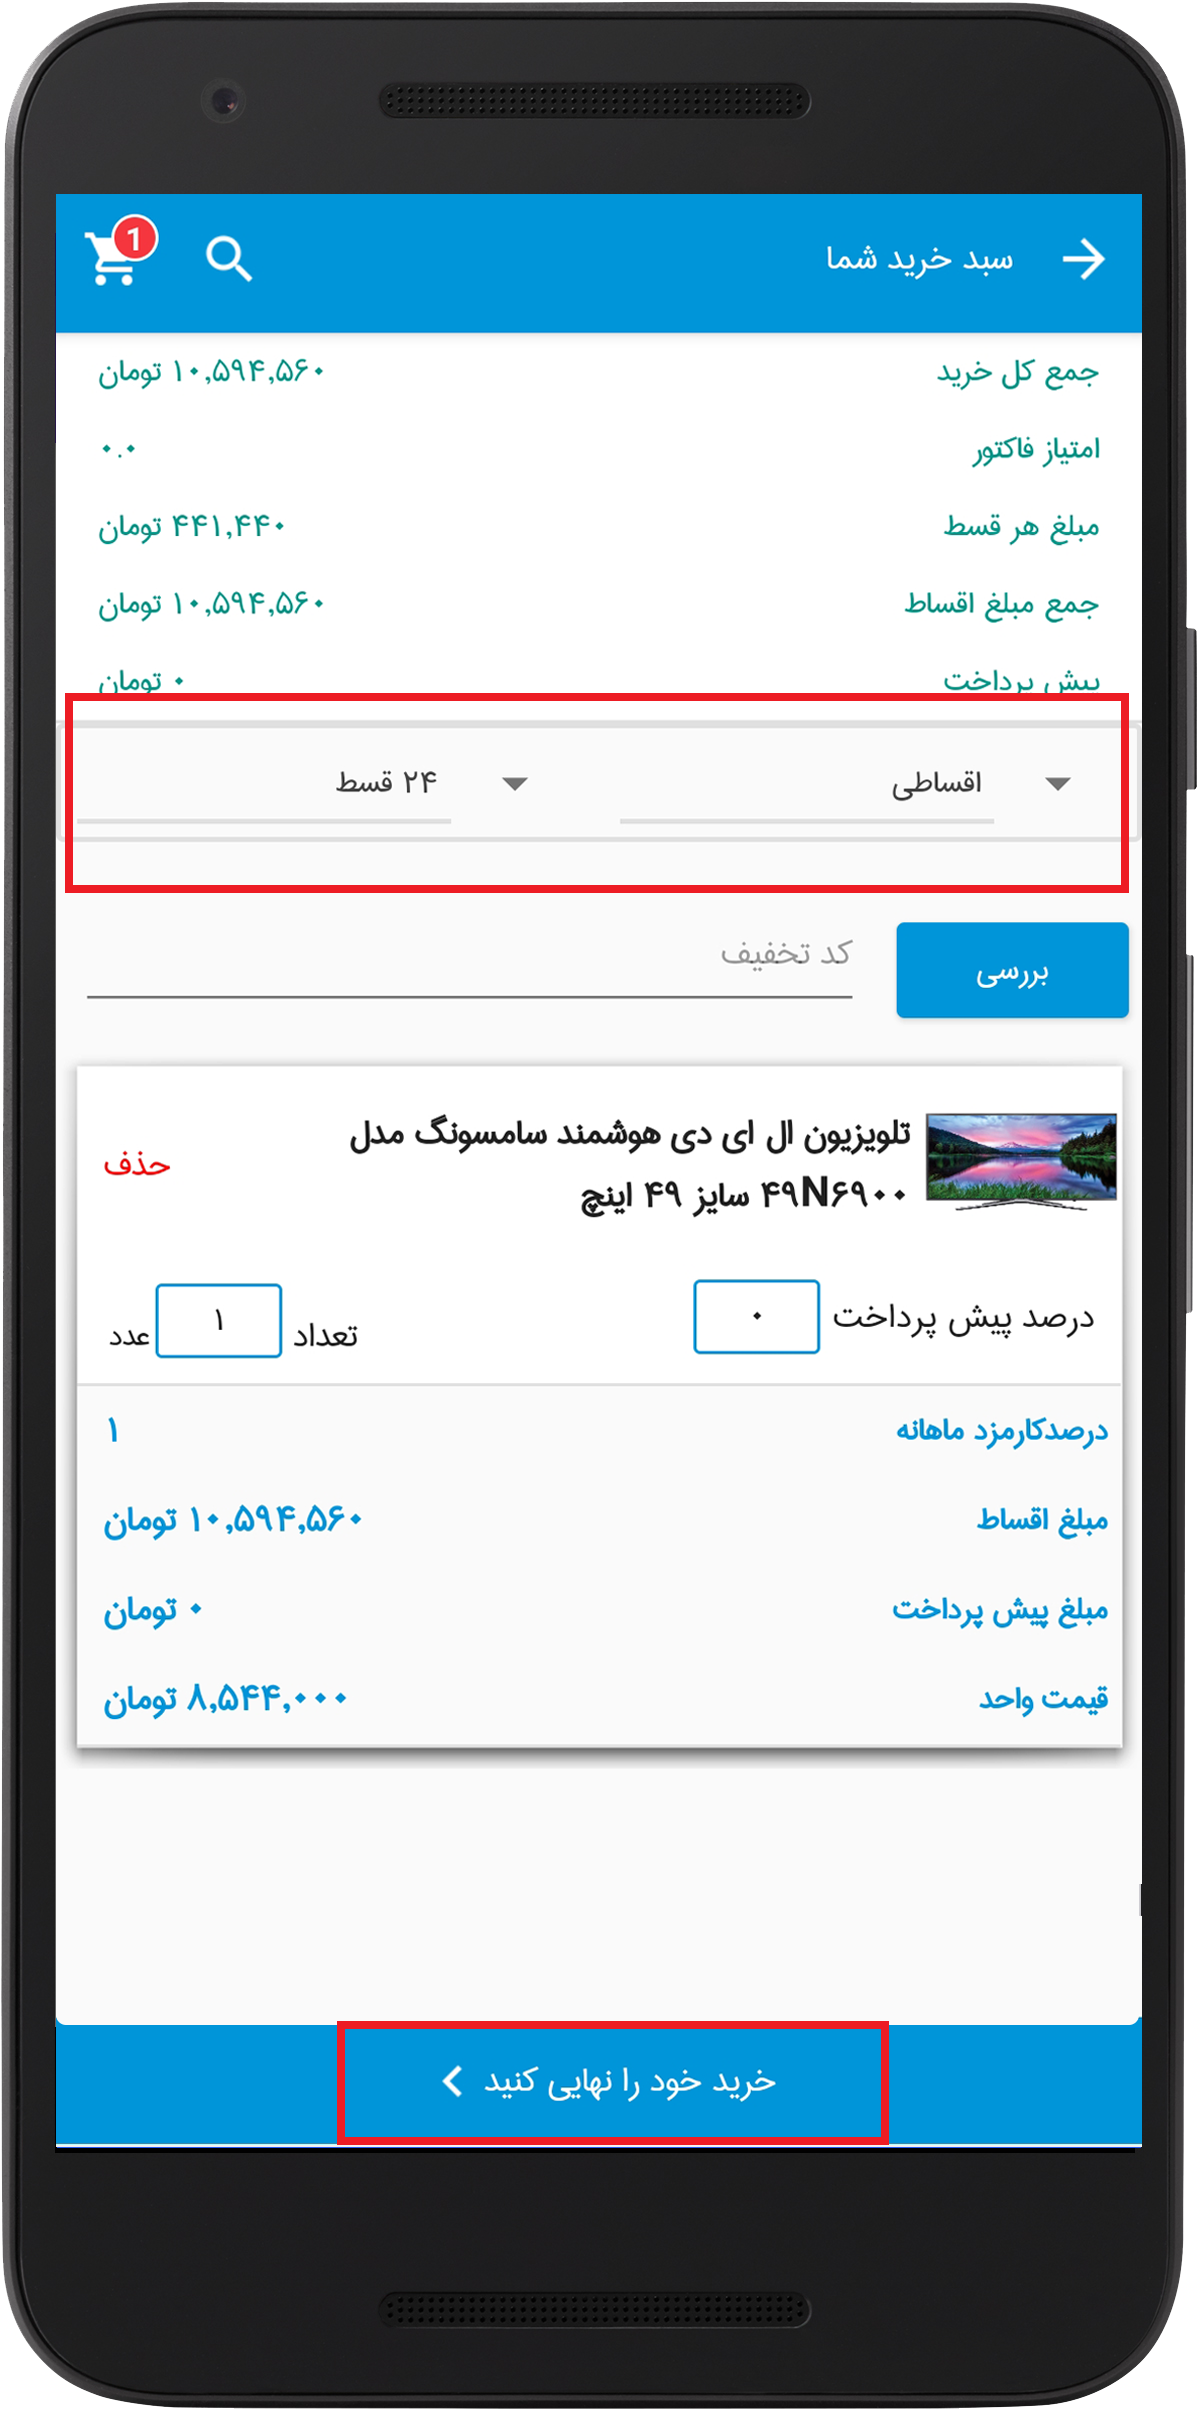
۳٫۲) Registration of order in the application

۴) Referral to the credit operator (this is optional and can be done according to store policy)

Once the order has been registered by the customer, the store administrator must confirm the order. If the Administrator wishes to complete the information required for approval of the installment order by the Operator, the Administrator should refer to the Administrator’s login address in the Admin Panel> Orders Menu> Orders List in his Admin Panel. .

Edit your order on the next page and refer it to your desired operator from the credit center reference section.

Next, the operator must verify, complete, and save the desired information; for this, he must first enter the address of the panel.

Manage> Orders menu> Orders list

Refer to your admin panel.

On the next page the operator has to edit his order and if the order is approved he field “Is the order approved?” Put it on “yes”.

The order page will appear on the confirmation page, after which the required information should be clicked on the save button.

Next, the administrator can confirm the order.

Note: All operator-related steps, including operator definition, referral to him and optional approval, can be defined if the store administrator wishes and according to his policies.

If you have any questions about this tutorial you can ask it via Ticket.

نتیجه‌ای پیدا نشد.

فهرست